
Configuring Google’s Free DDNS Service on the Ubiquiti Dream Machine Pro
The Ubiquiti Dream Machine Pro Works a DDNS Client for Google Domain’s Free DDNS Service
For the purpose of this article, DDNS is a service that updates IP address changes to a hostname or top level domain (TLD) DNS record. This is especially useful if you do not have a static public IP address from your ISP. It is also more scalable as your network environment changes. DDNS allows services that require persistent addressing, such as monitoring and VPN services, to access a network even if the IP address changes. For example, if you want to use the L2TP VPN service on your UDM-Pro.
The Ubiquiti Dream Machine Pro (UDM-Pro) can act as a Dynamic Domain Name System (DDNS) update client for a number of DDNS services, including Google Domains.
The Ubiquiti Dream Machine Pro, Image from store.ui.com
If are in need of a free and reliable DDNS service, check out our guide on How to Use Google’s Free DDNS Service.
This article will show you how to set up the UDM-Pro to use Google’s DDNS service to update dynamic public IP changes.
Setting Up the DDNS Service
Now that you have your DDNS service set up, it’s time to configure your UDM-Pro to act as an update client to push the IP address changes to your DNS records. The UDM-Pro supports a number of clients including NO-IP and Afraid. We focus on Google Domains DDNS service here, but the set up would generally be similar for other DDNS services. While Google Domains isn’t specifically listed as a DDNS service, it’s architecture is built on DynDNS, so we’ll select that as the DDNS service provider on the UDM-Pro.
NOTE: The screenshots in this guide are from Network v7.2.92.
First, log into your UDM-Pro Network Application from Unifi OS, either directly or through the cloud service. Navigate to “Settings” (the cog icon) on the left hand side and then “Internet.” Select your primary WAN interface, typically “WAN 1,” to access it’s configuration page. Toggle the Advanced Settings to “Manual.” Scroll down to find the Dynamic DNS section and select “Create New Dynamic DNS.”
Click to configure a new DDNS service
This will open a new window where you can input the following settings for your Google Domains DDNS service.
Service: Dyndns
Hostname: The hostname or domain name set at Google Domains. We’re using “ddns.atechdevs.com,” see How to Use Google’s Free DDNS Service for more set up
Username/Password: Generated by Google Domains DDNS service
Server: domains.google.com
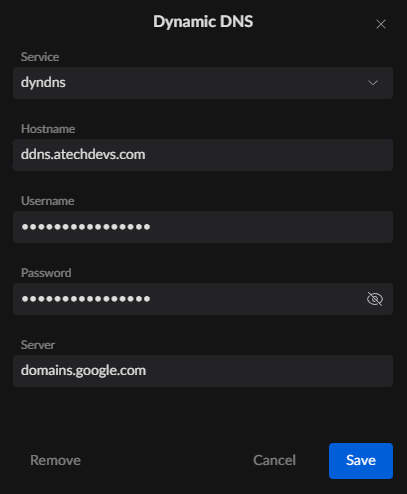
Enter the DDNS Settings for Google Domains on the UDM-Pro
Click Save and the DDNS client service will be active. In our testing it only takes a few minutes (or less), for the IP address to get pushed up to Google Domains name servers. You’ll want to log into your Google Domains account and verify that you see your current public IP address listed under “Data” in the Dynamic DNS record, indicating that both the client and server side of your DDNS service is working.